I'll be attending the Atlanta Woodworking Show this weekend and manning the GWA booth from 10-12 - come by and say hello.
Info here
-- John
Saturday, January 24, 2009


Monday, September 29, 2008
Basement Shop Progress Pics 2008.09.28
The ceiling is finally sealed up - next on the list is finishing the ducting for the DC. I managed to move all the rest of my lumber (temporarily stored in another are of the basement) onto the existing racks - looks like I have room for about another couple hundred feet before it's at capacity - as it is what's on the racks is probably close to being unmanagable.
I also got the ambient duct collector up - got this Jet unit when it went on sale at Amazon last year. It works well filtering down to 1 micron with multiple speeds and a remote control (it can be set with a timer as well).

One of the ways I was able to manage the project was to move all my mechanics tools and metal working items into another area of the basement. I picked up a metal rolling workbench with wood top for $10 at a neighborhood yardsale (bought it and rolled it two blocks to the house - I bet that was an odd sight). I've yet to mount the swivel radial vise as I didin't have long enough nuts/bolts, but you get the idea. I also moved my HF Drill Press by the bench as a dedicated-to-metal driller. I'm either putting a cabinet or some peg-board above the bench - haven't decided yet. Across from the bench is another short cabinet with my 3 Ton arbor press and two metal roll-away tool boxes. I'm still looking for at least a 20 Ton Hydrolic press to add to the mix as well and a small metal lathe. Here are some pics:


Finally I used the aisle leading into my workshop as a place for storing files and reference books. This was put together with scrap Standards and Brackets I've had banging around in my rat-hole for years, along with some salvaged pine shelving. Beneath is a metal barrister's bookcase housing binders with a complete collection of Woodsmith and Shopnotes. The cardboard magazine holders have a complete run of Wood Magazine and Fine Woodworking (some left-overs are in a box on the floor - have to figure out a way to get those on the shelf). The bookcase also haa a shelf full of small motors on it as well as an original vintage red Swingline stapler.

I've started placing some equipment but haven't gotten anything "in stone" yet. May reconfigure depending on how things lay out.
-- John
I also got the ambient duct collector up - got this Jet unit when it went on sale at Amazon last year. It works well filtering down to 1 micron with multiple speeds and a remote control (it can be set with a timer as well).

One of the ways I was able to manage the project was to move all my mechanics tools and metal working items into another area of the basement. I picked up a metal rolling workbench with wood top for $10 at a neighborhood yardsale (bought it and rolled it two blocks to the house - I bet that was an odd sight). I've yet to mount the swivel radial vise as I didin't have long enough nuts/bolts, but you get the idea. I also moved my HF Drill Press by the bench as a dedicated-to-metal driller. I'm either putting a cabinet or some peg-board above the bench - haven't decided yet. Across from the bench is another short cabinet with my 3 Ton arbor press and two metal roll-away tool boxes. I'm still looking for at least a 20 Ton Hydrolic press to add to the mix as well and a small metal lathe. Here are some pics:


Finally I used the aisle leading into my workshop as a place for storing files and reference books. This was put together with scrap Standards and Brackets I've had banging around in my rat-hole for years, along with some salvaged pine shelving. Beneath is a metal barrister's bookcase housing binders with a complete collection of Woodsmith and Shopnotes. The cardboard magazine holders have a complete run of Wood Magazine and Fine Woodworking (some left-overs are in a box on the floor - have to figure out a way to get those on the shelf). The bookcase also haa a shelf full of small motors on it as well as an original vintage red Swingline stapler.

I've started placing some equipment but haven't gotten anything "in stone" yet. May reconfigure depending on how things lay out.
-- John
Tuesday, September 23, 2008
Basement Shop Progress Pics 2008.09.18

Got the brackets on the John Sterling standards loaded up with a Walnut tree I've had stored in the carport for 2 years. This tree was taken down over 20 years ago and cut up into about 50 boards (at least by the time I got it there were 50 - I'm not sure how much was actually produced as some had been used and there are missing pieces of the stack when aligned). The nice thing about having all the wood from the same tree is most of the color is the same once finished. There are also some interesting figure where the tree split into two trunks. I think it sat on the ground for a while as there are pin-holes along some boards where various insects had eaten into the sap - anything that was suspicious was cut away. Another interesting aspect - most of the wider and thicker boards were the straightest and had minimal checking and splitting - there's evidence of stickering on those - the smaller boards were probably just piled up with weight, I suspect. I also had some red oak and the rest of that haul of sapele in the carport so it's now all on the wall.

I also managed to get another length of the ceiling sealed up. Next up is the Jet ambient dust collector.
-- John
Wednesday, September 3, 2008
Basement Shop Progress Pics 2008.09.02

Finally got the cyclone mounted up and it runs fine in its new position. This time I used the stand - I looked into wall mounting but didn't feel comfortable with the type anchors I would need in the block wall. An alternative would be to build a torsion box wall for the unit to attach to, but after calculating the amount of room it would also take, it made better sense to just use the Grizzly-made stand.

Note the cut-out in the ceiling to clear the motor housing. It's wrapped in insulation to cut-down on noise and I was careful to isolate the entire unit from touching the walls or ceiling, to help cut-down on vibration. It's still loud, but mostly from the on-rush of air, rather than from the unit itself.

You might wonder how I got this guy assembled - normally you would put together the bulk of the cyclone on the stand on its side, then tilt it up into position (the manual recommends 3 people). I didn't have that luxury both in man-power and in ceiling height. I noodled this one for a while before coming up with a method that worked. I first built the top of the stand and attached the cone and impeller housing before laying on its side. Next I built a wood platform with castors that fit inside the stand. I then tilted up the whole unit until it stood on the wood stand and set the motor and impeller on top, attaching with the supplied bolts. I next rolled into position. Once in position I was able to determine where the cut-out for the motor needed to be and I could finish up the ceiling with the unit rolled out of the way. Once that was done, I rolled back the unit and slowly added blocking to front and back, raising up the whole unit the thickness of a 2x4 at a time. This took some time and I did have one accident where most of the blocking fell and the unit crashed into me - luckily the back edge was still supported and I was able to hold the unit up until I could get blocking back under it (I do have a nice large bruise on my left arm as a temporary record of the event).
Once the unit was up about an inch higher than the bottom stand legs, I nudged the wood support until I could get the right back leg attached, the nudged and rotated the stand until I could get the opposite leg attached, rolling the stand towards me so the back corner leg was exposed. I put a 4x4 block "leg" under the front corner for some extra support and attached the leg in the back corner. Using this same support I rolled out the stand, holding the unit upright to pass the temporary leg. I finally attached the front leg and was able to tighten everything up - I ended up needing to shim the front leg to accomidate differences in floor height to level. There were a few moments in there that caused the ole sphincter to tighten, but it wasn't too bad. I did feel like I had been in a fight the next morning with soreness all over. Nothing like holding up 300 or so pounds of top-heavy metal by yourself while maneuvering around, with a possibility of the whole thing falling on you at any minute to get the stress up.
Finally I attached the filter and placed the dust canister underneath. One thing I didn't think about was the need to remove the cannister - I'm going to have to keep space open next to the unit so it'll roll out. I'm thinking right now of placing a piece of wheeled equipment there so it can easily be moved for dust canister removal.

Here's a close-up of the motor cut-out. Everything is well wrapped in HVAC metallic tape, as are all seams throughout the ceiling - this is to isolate as much dust as possible from the rest of the house.

I also started working on one of the metal/wood workbenches I picked up in that haul that included the Walker Turner sander. This bench was pretty rough - paint flaking off everywhere on the metal stand as it had been painted an institutional green. As the underside showed a gray I decided to go with Rustoleum Dark Machinery Gray, over brown primer. The entire stand was first sandblasted to removed as much of the old paint as possible - it's not perfectly smooth but it'll do as a working table.
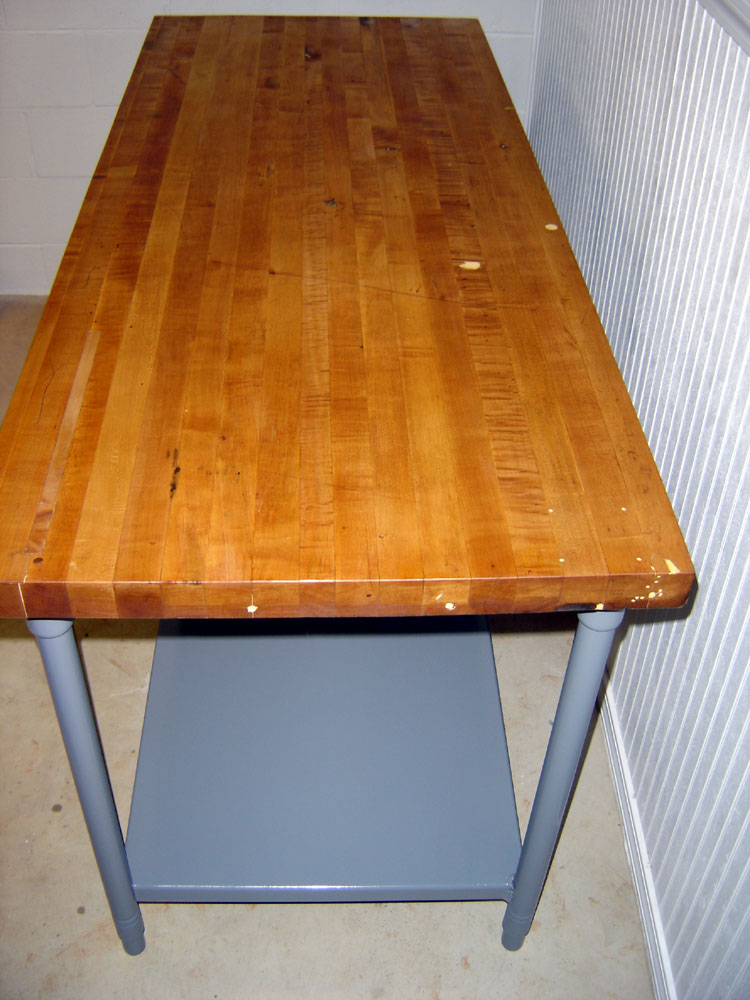
The idea was not to get this to furniture quality, but rather to create a reliable work surface without paint flaking off everywhere. To that end I also sanded and filled the maple butcher block top - it had actually been flipped at some point so the worse surface is face-down - it's filled with hundreds of drill holes, cuts and scrapes. It must have been used in a metal shop where people liked to use it to support drilling - it also had numerous burns and spills saturating into the wood. I got off most of the muck (oil and metal shavings) using 80 grit (both sides), filled the worst holes then re-glued/clamped some strands that had delaminated, before I surfaced again with 80, following up with 120 and 220 on the top and edges. I also replaced the missing threaded rods that hold the ends together (3/8" threaded rod donated by fellow GWA member, Tommy Roland - an artisan if there ever was one and nice enough to share his knowledge and experiences). Here's a side view after one coat of BLO.
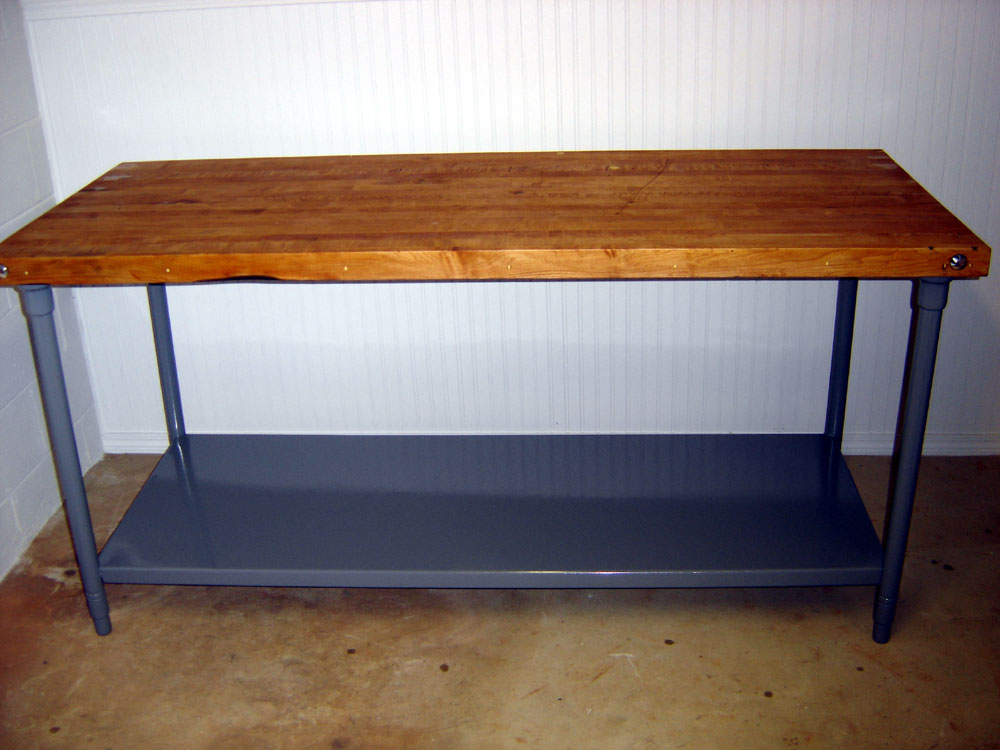
I plan to put 2 or 3 more coats of BLO on the wood portions before waxing with paste wax. I prefer the natural oil finishes for something like this that will get banged on, rather than film finishes that would crack with constant pounding and use - after all, it's not fine furniture. I've also completed about 1/2 of the space as far as sealing with HVAC tape. Still to go is sealing the rest, re-hanging my lumber on the standards you see in the pics, hanging the ambient dust collector, the ducting and some task lighting. Oh and placing the equipment - there's still that.
-- John
Monday, August 18, 2008
Basement Shop Progress Pics 2008.08.11

Here are some of the latest progress pics - things are going along slowly but surely. The image above shows what I'm doing with the ceiling - to improve sound dampening I put some R30 insulation between the joists and am using some foam-cored 1/2" board. It's sort of a mega-ceiling tile that's screwed in with taped joints (that's metallic HVAC tape). Each piece is hand-fitted to eliminate gaps - the idea is to provide something that's removable but still blocks out dust and as much noise as possible - the foil backing should improve the lighting a bit. I wired everything to a 100 amp sub-panel with 3 dedicated 20 Amp 240 circuits - you can see in the photos the metal conduit drops on the block wall (exterior of the house, underground). I also have my old shelving standards along the block wall which are attached using a hook at the top and then Tapcons into the block. Speaking of the block wall - originally I wasn't going to paint it but with everything else going on I decided to hit it with a couple of coats of DryLox - it should create a more stable environment.

I also brought in more of the wood I had stored out in the carport so it would start acclimating to the change of environment - my basement is at about 50% humidity via dehumidifier - much less than what is normal in the Atlanta climate. You can see the pile peeking from behind the stack of equipment in the next photo.

I guess I should mention the Grizzly Dust Collector - it's a 2HP Model GO440 - don't think I have in previous posts. I purchased this on CL super-cheap from a guy in the Florida pan handle. Seems he was looking at it on the Grizzly site and said something about wanting it - his wife overheard him and bought is as a surprise Christmas present. He hung it on the wall in his garage shop then realized his truck wouldn't fit in the garage - so it had to go. He started the pricing fairly high, then week by week started lowering it - when it got to something I felt was worthwhile I wrote the guy and asked if he ever came up to Atlanta - turned out he had a cousin in Noonan and was willing to bring it up - I met him with my trailer right off an I85 exit. He had only partially disassembled it, which will make it super easy to reassemble. Considering I was looking at units in the $1K+ range for my needs, I'm very happy to have found this.
In photo 2 you can see the space in the far corner - that's where the cyclone is going - I was originally going to put it in the adjoining room but had some worries about the furnace and other pilots there igniting any fine dust - there's also a large beam and ducting which would have been routing the DC ducting troublesome so I opted to take up some of the precious space in the shop area. I originally thought about a wall mount but by the time I figured out a hanging method it made more sense to use the Grizzly stand. It sticks up between the floor joists above so I've wrapped the area in a box-shape so the motor is isolated - there's additional insulation to help with noise. I've actually made a bit more progress than this so I'll have updated photos soon.
-- John
Saturday, May 24, 2008
LatheFront
My latest find is this late 30's Boice-Crane 46" Gap-bed lathe. This one is rather special with what looks to be the original paint (complete with labels), tail stock, tool rests and extra spindles. This is the first I've seen with metal legs and it's pretty much a user (after a little clean-up).

Sunday, March 23, 2008
Latest Acquisitions 2008.03.23
Thought I would take a moment to describe the latest in old 'arn that I've gotten over the last few months.

First up is this 24" Rockwell Scroll Saw Model 40-440 Serial Number FP-1467. This was from a Craigslist ad listed for $75 - reduced to $65 because the seller couldn't find the insert (ended up buying one from an OWWM member for $8). I'm not showing the stand, but it was also included - typical Walker Turner/Delta/Rockwell with splayed feet and square bolts. This example also comes with the cast belt cover but not the light (one could only wish - those are going for crazy money these days). It also has a magnetic switch installed so it was probably used in some production environment (guessing there). Very nice Delta/Rockwell motor with knurl for hand turning.

Found this Franklin Electric motor converted to a single disc grinder. It was $5 and I figured I could use it for something.

I spotted an ad for a few misc. 3 phase motors and in the middle was one listed as a "driver" so I took a chance that it was a Walker Turner - turned out I was right. It also came with the reversing switch - I'm not sure what it was used for - at first I thought a shaper but at 1/3 HP probably not. Not bad for $10.


That's it for this post - I still need to take some pics of the Rockwell Radial Drill Press I picked up, as well as a Sears Dunlap 8" table saw. I'll have those posted soon.
-- John

First up is this 24" Rockwell Scroll Saw Model 40-440 Serial Number FP-1467. This was from a Craigslist ad listed for $75 - reduced to $65 because the seller couldn't find the insert (ended up buying one from an OWWM member for $8). I'm not showing the stand, but it was also included - typical Walker Turner/Delta/Rockwell with splayed feet and square bolts. This example also comes with the cast belt cover but not the light (one could only wish - those are going for crazy money these days). It also has a magnetic switch installed so it was probably used in some production environment (guessing there). Very nice Delta/Rockwell motor with knurl for hand turning.

Next up are a couple of old hand-drills. The 5/8" Van Dorn I ended up getting while picking up a Rockwell Radial Drill Press (I'll have pics up in a later post - forgot to take them). Got it for $25 - it's slow but has tremendous torque.


Found this Franklin Electric motor converted to a single disc grinder. It was $5 and I figured I could use it for something.

I spotted an ad for a few misc. 3 phase motors and in the middle was one listed as a "driver" so I took a chance that it was a Walker Turner - turned out I was right. It also came with the reversing switch - I'm not sure what it was used for - at first I thought a shaper but at 1/3 HP probably not. Not bad for $10.


That's it for this post - I still need to take some pics of the Rockwell Radial Drill Press I picked up, as well as a Sears Dunlap 8" table saw. I'll have those posted soon.
-- John
Subscribe to:
Posts (Atom)