Wednesday, June 13, 2007

Unisaw - Part 3 Continued

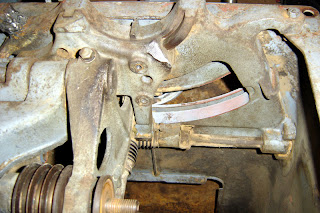
Took some additional images from the last stage, these include the broken tooth (near the bottom, 6th):


These images show the ground out front trunnion bracket (the welds have been ground down) - there's a small hairline gap in the inside corner - I'm having it touched up this weekend as well as some slight voids.


The inside of the case isn't bad - not much rust at all, mostly at the bottom (expected). No weird cut-outs or anything - just some clean-up. I've already banged out some edge dents that will be followed up with a light coat of body putty.


The base has ruts but mostly surface with little pitting - I think it will clean up well with the sandblasting - any rough spots I'll hit with body putty. There are two holes that were cut with the castors - I'm not yet sure what to do about those. Welding to the cast iron seems excessive.


Once I have the trunnion assembly pulled apart I'm starting on the motor rebuild - I may go ahead and take it apart so the commutator can be turned.

-- John

Monday, June 11, 2007

Unisaw - Part 3 Dissembly

For this phase of strip down, I managed to remove the motor and blade raise and tilt wheels. Many of these photos I took for later reference, as I know I'll need them at some point for reassembly:


I managed to remove the trunnion assembly and brackets without pressing out the worm gear spindles. I was at the point of dissembly this past weekend where I had the guts loose, but couldn't figure out how to get them out. I basically tilted up the back trunnion bracket while jockeying the front and moving the trunnion assembly back and forth until the back bracket had room to come out. Once that was done removing the "rest" (the "tilt trunnion bracket - the piece that holds the front of the trunnion assembly up on the front bracket) allowed the whole assembly to be removed in one piece. So now I have the front and rear bracket, plus the trunnion assembly, which is where I stopped in hope of finding more info on what's needed to tear it down - I got that from a recent post on OWWM.org (Old Woodworking Machinery.org - great site with a large group of woodworkers and old machinery collectors who are great about sharing information).

As you can see in the last pic, I've already got the ring apart from the base (ended up having to cut two bolts that were badly stripped) and banged out a few dents - everything is ready for media blasting (case-wise). I hope to get more dissembled this week so I can blast this weekend. I'll follow that with some body work, primer and paint.

-- John

Unisaw - Part 2 Dissembly

Since I mostly have time only in the weekends, the Unisaw project will come in dribs and drabs. Here are images from the first stage of dissembly - I actually started this 2 weekends ago and managed to get into the interior yesterday (Sunday 06-11) buy haven't edited the photos yet, so I'll probably post those later this week. In any case, here are the initial tear down images:


There are close-ups to my "big surprise" - the welded Front Trunnion Bracket. I've since ground it down (you'll see pics in my next batch). In the last photo is the serial number label - it was covered in several layers of paint - this is what it looks like after rubbing down with "goof off" - I've not got to replace the missing red and black for the label, but will wait until I remove it to complete.

-- John

Saturday, June 9, 2007

Modern Wood Screen Wall

Saw this on another board I frequent:

http://www.owwm.org/viewtopic.php?t=25269 (have to be a member to log in so I've reproduced the post below)

Poster is the Carl Kunkel, son of "Mr Sawdust" Wallace Kunkel (famous for his work in promoting the Dewalt Radial Arm Saw). Read how the screen is put together - it's meticulous and well thought out.

More info on Mr Sawdust here:
http://www.mrsawdust.com/

His Post titled "Fung Shway!"

Hi all, Here's a 16' trellis/wall I made and installed this week in a 17 story apartment in the Village NYC. From the pictures, it doesn't look like much but it was quite a bit of work. It's made of clear cedar and the designer specified he didn't want to see any nails or filled nail holes so I had to fashion 560 aluminum plates (4 holes apiece, 2 countersunk) in order to screw the 1"x1" slats to the posts from behind using all stainless steel screws. The slats are set into a 2 step Dado, one for the plate and 1 for the slat. I pre-stained all the material and it all had to fit in a small service elevator.

The back is 1/2" marine plywood painted a gloss red and will have special lighting inside. The right side of the wall gets a 1"1/2 thick marble slab. The install was a bear as they always are in NYC. It always amazes me what those NYC designers come up with but it pays the bills! Anyway, here's a few pics..

Posts with plates


Staging


Installed


You can see his RAS (Radial Arm Saw) in the top photo - and by all the dadoes cut in those posts for the plates, it was put to good use.

-- John

Thursday, June 7, 2007

Unisaw - the Beginning

Recently I've become interested in purchasing a bit heavier saw for the shop, preferably a decent Unisaw or Powermatic, to replace my aluminum Ryobi BT3000 (which I've used quite a bit since I originally bought it in 1993). I started watching Craigslist and one at a reasonable price came up - it was in Columbus GA and was listed as a 3HP Unisaw in working condition for $500 - this same saw was originally listed at $750 and I figured the guy was ready to make a deal. When I talked to him on the phone he indicated he would take $450 for it, so I took a trip down to Phenix City AL (right outside of Columbus, which is on the border of GA and AL). When I got there I was very dissappointed, as it wasn't the saw I thought I was getting - the 3HP units started becoming available in the 70's and are still made today - I thought that was what he had - instead I found an old 50's Unisaw with a 1HP motor.

I basically told him I didn't want it, but he asked me what I would offer him - I replied that I would pay $300 for the saw and he told me that it wasn't enough, etc. I started to drive off when he came back and offered to split the difference with me - I said no and he relented, so my trip wasn't wasted. I got a working saw for $300, and while it's not exactly what I wanted, I decided to start researching the saw and see what I needed to do to get it in fine woodworking condition. That's when I refound the Old Woodworking Machines forum. What I read there got me interested in fully restoring the saw. I had visited it previously to download a Dewalt catalog for my 790 Radial Arm Saw - which I found at an estate sale for $60. I started to restore the saw and have put if off for now, as the Unisaw is more interesting.

So here are images of the saw - only real issues: saw has been heavily painted, first red then gray, so it will require stripping to bare metal to make it right. The motor label is missing, one of the tables has a chunk busted out on the edge, and when I peeled off the top I found a welded front trunnion bracket. Here are the pics:


More images to follow as I start stripping down the saw for sand blasting.

-- John

Tuesday, June 5, 2007

Welcome to Modern Woodworking

As a blogger, I often find that it's difficult to post when my blog has a specific topic, so I created a blog that's more generalize - johnnyapollo.blogspot.com, which focuses mostly on my thoughts about collecting, eBay buying and whatnot. However I have several other blogs that focus on my other interests: ModusModern for modernism, VehiCROSS as an enthusiast of the truck, MajorMattMason for the Mattel toyline, and now ModernWoodworking for my love of working with wood. I chose Modern Woodworking as I plan to focus on using modernist elements in my furniture building, developed by designers such as George Nelson, the Eames couple, Noguchi, Nakishima, the list goes on. I'll be using elements that I like with respect to those great designers, trying to imitate in homage and not copy. I'll also use this blog to relate my adventures in finding and restoring woodworking machines and tools. My next post I'll describe the restoration of a 50's Rockwell Unisaw, which I recently purchased.

-- John